anX’s Complete HQ CS:S Movie Guide
NOTE: This a copy of anX's guide found on the Cal forums and on his clan website forums at: http://www.iue5.com/
Complete HQ CS:S Movie Guide by anX
High Quality wmv, x264, or Xvid for advanced users
Version 1.9.2: Last Updated 7/1/07
================================================== ========
Table of Contents:
----------------------------------------------
1. Movie Config
2. HQ Movie Files
3. Before You Get Started
A. Separate CSS Icons
B. Enabling Visible File Extensions
C. Windows Sound Settings
D. Video Card Driver Settings
--Nvidia
--ATI
4. Encoding and Compiling Files Section
-Includes Links to All Freeware:
--VirtualDub
--Windows Media Encoder
--HuffYUV
--VLC Media Player (x264 Playback)
--x264 Encoding File Pack by anX
--Xvid Encoding File Pack by anX
5. Recording in CS:S
6. Screenshots to avi in VirtualDub
7. Editing Program to Uncompressed Master File(s)
A. Sony Vegas to Combined Uncompressed Video and Audio for wmv
B. Sony Vegas to Separate Uncompressed Video and Audio for x264 or Xvid
C. Adobe Premiere to Combined Uncompressed Video and Audio for wmv
D. Adobe Premiere to Separate Uncompressed Video and Audio for x264 or Xvid
8. Encoding
A. Windows Media Encoder for wmv
B. FAAC, MEGUI, and more for x264
C. LAME, VirtualDubMod, and more for Xvid
1. Movie Config v2.3:
Download: http://files.filefront.com/movieconf.../fileinfo.html
I definately spent the most time working on this. It contains all your basic movie commands (hides radar, text, all that), sets all your settings on high, and has a lot of common binds already set up for you. You can toggle wireframe, mat_proxy, hud, radar, spectator bars, you name it.
I worked parallel with CAL|Barelds on this (literally, we sat in IRC relaying ideas back and forth). He helped me get it perfect, and showed me a bunch of useful things. Thus, our movie configs are pretty similar. Here's a link to his: http://forums.caleague.com/showthread.php?t=91265
2. HQ Movie Files v4:
Download: http://files.filefront.com/cssmovief.../fileinfo.html
This movie pack contains the following:
1. A modified version of Fragalicious' HUD remover (www.csflicks.net). The original changed the kill notice text and
gave it a shadow. I changed it back to default.
2. The materials folder and blue LED bomblight from ARN's CSS Movie Making GUI. I did not include the GUI's hud remover because the clientscheme.res changed too many in-game texts. The materials folder includes high quality textures, better explosions, and much more. Along with it comes a custom movie making background and a custom movie GUI.
3. Spectator bar removal for POV demos. These are NOT recommended for sourcetv demos, because you can toggle the bars with the movie config. Read the installation section in the readmeon how to enable/disable the spec bar removal.
These files will remove the HUD in CSS and make your game look downright sexy when used with the movie.cfg. It took a while to modify them so the texts in the game are all default, but I think I got it figured out.
NOTE: The HUD toggles in the movie.cfg will not work with these files in use. The HUD is permantly off when using the new scripts and resource folder.
I am not the original creator of the resource, materials, or scripts folder in this pack. I only modified them so that the game had all default texts with maximum settings and high quality materials.
NOTE: After the recent sv_pure update, the high quality materials of these movie files no longer work. The hud remover, however, works just fine.
3. Before You Get Started:
3A. Separate CSS Icons
I recommend using two separate CSS icons on your desktop: one for playing and one for making movies. I would also recommend NOT using an autoexec. Why? Well, you don't want stuff loading from your autoexec as you make movies, and vice versa. If you don't use an autoexec, skip this and go onto "Things you'll want/need."
So, here's what I do. Go to your cstrike/cfg. Open up your config.cfg. Back up any personal commands, then completely empty it. Save it and close the window. Then right click on the file > properties > check the "Read-Only" box. This will prevent things from the movie config saving into there.
Then rename your autoexec.cfg to play.cfg. Make sure you have ALL of your binds in there (for movement and everything).
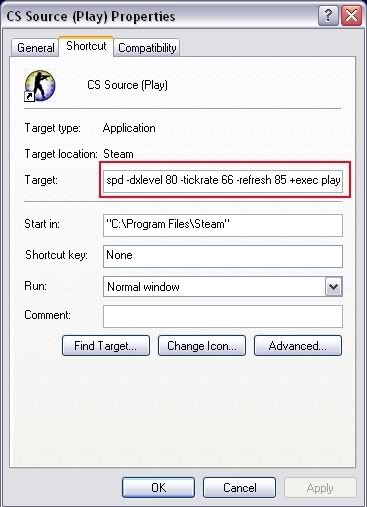
Now we go to launch options in your two CSS desktop icons. I'll be using defaults for resolution. Change the -w and -h to whatever your res is. You can also change the dxlevel in your play icon to whatever you usually use.
For your play CSS icon:
-fullscreen -w 1024 -h 768 -dxlevel 80 +exec play
For your movie CSS icon:
-windowed -w 800 -h 600 -dxlevel 95 +exec movie
Example:
3B. Enabling Visible File Extenstions
Also, I HIGHLY HIGHLY HIGLY recommend enabling file visible file extensions in windows. Actually, it's required for x264 encoding, so just go ahead and do it.
Control Panel (in classic view) > Folder Options > View Tab:
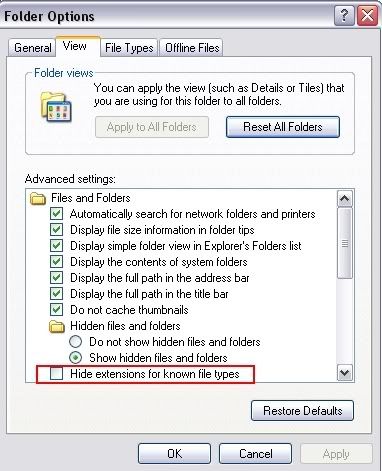
Uncheck that box.
3C. Windows Sound Settings
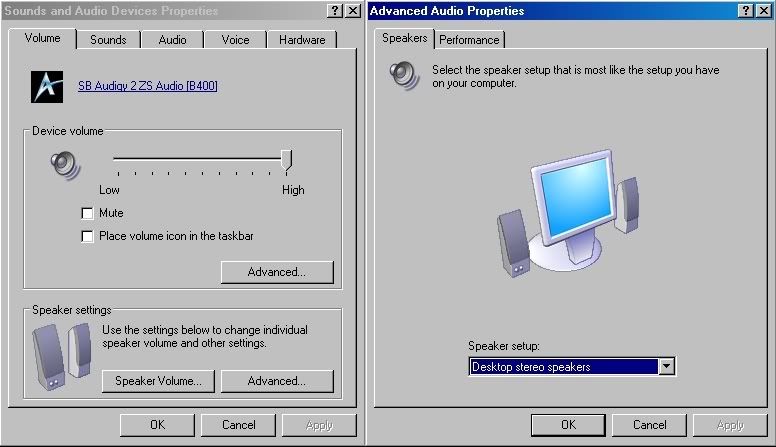
CS:S cannot record surround sound audio. If your audio settings are at 5.1/7.1, the audio file you record will be 0 kb. I recommend using Two Speaker settings. Not only will your audio record, but this is the best audio setting to play at BY FAR unless you're using 5.1/7.1 headphones.
Control Panel (in Classic View) > Sounds and Audio Devices > Volume Tab > Advanced (under Speaker Settings) > Set your Speaker Setup to "Desktop Stereo Speakers"
3D. Video Card Driver Settings
CS:S does not contain commands for maximum AF/AA. For example, the maximum Filtering command in CS:S is mat_trillinear 1. Any mainstream card made in the past couple years can support higher AF than trillinear. Thus, it is best to force maximum settings in your video card drivers
Nvidia (Forceware 84.26):
Right click on your desktop > Nvidia Display > "monitor name" > "video card name" > Performance and Quality Settings: Turn everything up to its maximum, and uncheck any box that says "Let the application decide."
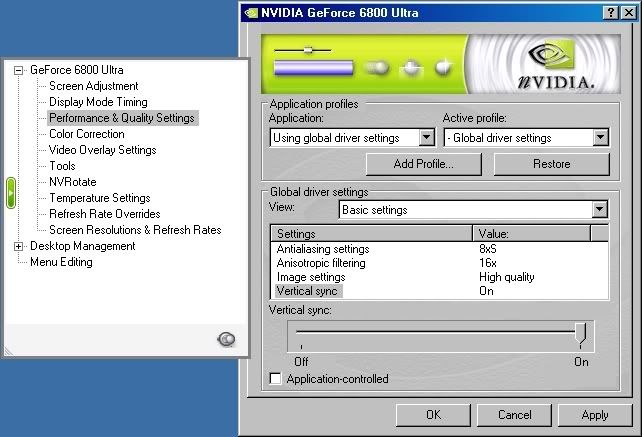
I know these aren't the newest drivers, but newer ones cause some problems with my PC. You should get the idea of what you want to do.
ATI (Catalyst Control Center):
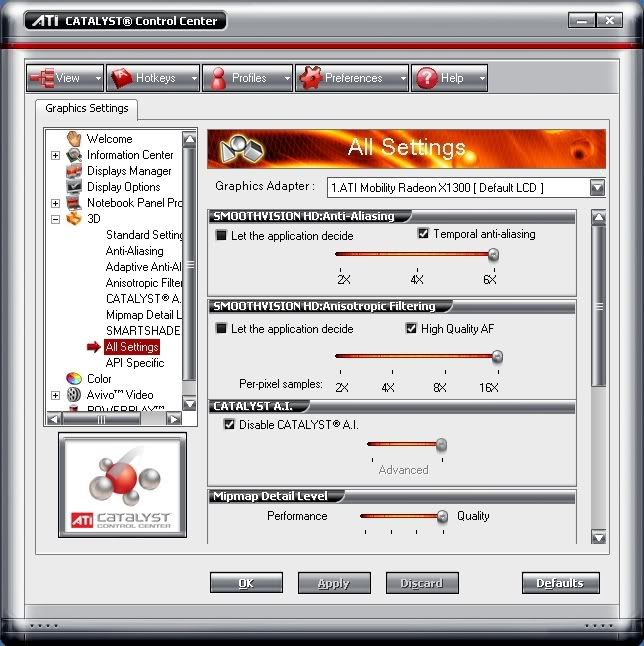
Right Click on your Desktop > ATI Catalyst Control Center > 3D > All settings: Turn everything up to its maximum (excluding Catalyst AI and Smartshader Effects), and uncheck any box that says "Let the application decide."
4. Encoding and Compiling Files Section:
Disclaimer about wares: Do NOT post links, ask for publicly on these forums, or PM me about illegal software cracks or downloads. That's not welcome here.
Required non-free Software:
-Counter-Strike: Source
-Sony Vegas or Adobe Premiere (I use Vegas 5)
Freeware:
-VirtualDub (I use version 1.5.10) Download: http://www.oldversion.com/program.php?n=virtualdub
-Windows Media Encoder (for easy wmv files) Download: HERE
-HuffYUV Codec for Lossless Compression Download: http://www.divx-digest.com/software/huffyuv.html
-VLC Media Player (x264 playback) Download: http://www.videolan.org/vlc/
-x264 Encoding Pack by anX Download: HERE
Contents:
---AVISynth 2.5.7
---YAMB 1.6
---FAAC.exe
---meGUI x264 specific version
---meGUI new version (multiple codecs)
---MP4Box.exe
---x264.exe
---A bunch of dlls and other files THAT YOU MUST KEEP IN THE SAME FILE AS THE .exe's.
-Xvid Encoding Pack by anX Download: HERE
Contents:
---AVISynth 2.5.7
---Xvid 1.0 (newer versions are without a few options)
---Xvid Bitrate Calculator
---LAME.exe
---Multifrontend.exe
---VirtualDub 1.5.10
---VirtualDubMod 1.5.10
---A bunch of dlls and other files THAT YOU MUST KEEP IN THE SAME FILE AS THE .exe's.
Optional Sofware:
-Adobe Photoshop
-Adobe After Effects
-3DS Max
-Particle Illusion
5. Recording in CS:S:
After executing the config:
- Hit the down arrow on your keypad to set your capturing rate @ 90 fps (or chose whatever framerate you want).
- Hit F11 to start recording. Hit F12 to stop recording.
- After recording a clip, hit control (host_framerate 0) for functional demoui speed control. Before you record your next clip, don't forget to hit the down arrow key again (or whatever framerate key you used).
All of that stuff should be in your console on the menu I made...
Now there will be a ton of .tgas and one .wav file in your cstrike folder all named a (or b or c or whatever letter you were on. You can record up to 26 times with F11 in one execution of the config. Nothing will ever get overwritten unless you re-exec the config).
Now close css and open up virtualdub.
6. Screenshots to avi in VirtualDub:
With virtualdub open:
- File > Open video file > click on the first ss in your cstrike folder (the whole series will open up
- Video > Framerate > change to whatever framerate you recorded at (90)
- Video > Color depth > decompression format: 24 bit, output format to compressor/display: 24 bit
- Video > compression > uncompressed OR HuffYUV (files section, lossless codec, no quality loss but output size will be less than half than that of uncompressed avi)
- Video > Full Processing Mode
- Audo > WAV audio > browse to your wav file in your cstrike folder
- Audio > Full Processing Mode
- Audio > Compression > Uncompressed
- File > Save as AVI
Done.
7. Editing Program to Uncompressed Master File(s)
7A. Sony Vegas to Combined Uncompressed Video and Audio for wmv:
I use Vegas 5, just for reference. Newer versions might be slightly different.
After you're done editing:
- File > Render As...
Now in your "Render As" window:
- Template: Default Template (uncompressed)
- Save as Type: Video for Windows (.avi)
Then click on the "Custom" button. In your "Custom Template" Window:
- Project tab > Video Rendering Quality: Preview (this will prevent deinterlacing and you will not lose any quality)
- Hit okay. Name it what you want, and hit save.
This is your master file. It's uncompressed audio and video, and you can encode it into whatever codec you want.
7B. Sony Vegas to Separate Uncompressed Video and Audio for x264 or Xvid:
I use Vegas 5, just for reference. Newer versions might be slightly different.
One thing you'll want to know about x264 encoding is that the resolution (both width and height) has to be divisible by 16. If you've been using 800x600, I'd just resize your video to 800x592. You should take this into account before you edit.
After you're done editing:
- File > Render As...
Now in your "Render As" window:
- Template: Default Template (uncompressed)
- Save as type: Video for Windows (.avi)
Then click on the "Custom" button. In your "Custom Template" Window:
- Project tab > Video Rendering Quality: Preview (this will prevent deinterlacing and you will not lose any quality)
- Audio Tab > Uncheck "Include Audio" box
- Hit okay. Name it what you want, and hit save.
This is your master video file. It's uncompressed and you can encode it into whatever codec you want.
After that's done, you'll need to produce the uncompressed audio file:
- File > Render As...
Now in your "Render As" window:
- Template: Default Template
- Save as type: Wave (Microsoft) (.wav)
- Hit okay. Name it what you want (preferably the same as the video), and hit save.
This is your master audio file. It's uncompressed and you can encode it into whatever codec you want.
7C. Adobe Premiere to Combined Uncompressed Video and Audio for wmv:
I don't use this program. This laptop came with premiere elements, and I'm basing this guide off of it. Your version might be different, but you'll get the idea of what you wanna do. I use vegas so yeah =/.
After you're done editing:
- File > Export > Movie... > Settings
Okay now you'll have a window opened called "Export Movie Settings."
There should be should be four categories on the left: General, Video, Keyframe and Rendering, and Audio. Now do this:
- General > File Type > Microsoft AVI
- Video > Compressor > Uncompressed
- Video > Frame size > whatever resolution you recorded at/want to render at
- Audio > Compressor > Uncompressed.
I don't know if you'll get deinterlacing on those settings or not (you don't want that), but that's the best I can do with a program I've never used lollll.
Hit okay and save it as what you want. This is your master file. It's uncompressed audio and video, and you can encode it into whatever codec you want.
7D. Adobe Premiere to Separate Uncompressed Video and Audio for x264 or Xvid :
I don't use this program. This laptop came with premiere elements, and I'm basing this guide off of it. Your version might be different, but you'll get the idea of what you wanna do. I use vegas so yeah =/.
After you're done editing:
- File > Export > Movie... > Settings
Okay now you'll have a window opened called "Export Movie Settings."
There should be should be four categories on the left: General, Video, Keyframe and Rendering, and Audio. Now do this:
- General > File Type > Microsoft AVI
- General > UNCHECK the "Export Audio" box
- Video > Compressor > Uncompressed
- Video > Frame size > whatever resolution you recorded at/want to render at
Hit okay and save it as what you want. This is your master video file. It's uncompressed and you can encode it into whatever codec you want.
After that's done, you'll need to produce the uncompressed audio file:
File > Export > Audio...
Name it what you want (preferably the same as the video), and hit save.
This is your master audio file. It's uncompressed and you can encode it into whatever codec you want.
8. Encoding:
8A. Windows Media Encoder for wmv:
WMV9 Codec:
Pros: Decent file size, good quality at any resolution. Very simple encoding process.
Cons: Toubles with color balance. Edges of reds can be lost, areas of green can be oversaturated.
- Open it up. A new session window will come up. Just hit cancel.
- Hit the properties button near the top.
- Sources Tab > Source From: File
- Sources Tab > File name > browse to your master file that you made in premiere/vegas
- Output Tab > Uncheck the Pull from Encoder Box
- Output Tab > Check the Encode to File box. Hit browse and save it as what you want
- Compression Tab > Destination > File download (computer playback)
- Video Size Tab > Blue resize text > Method: No resizing
- Processing > Pixel Format: YV12
- Hit apply. Then hit the green Start Encoding button near the top....
NOTE: This encodes @ 5mbps. Quality will be excellent, but you'll be sitting @ about 36-39MB/minute @ 800x600. Expect pretty large file sizes.
AND YOU'RE DONE.
8B. FAAC, MEGUI, and more for x264:
x264 Codec:
Pros: Lowest file size out of any codec, high quality at most resolutions.
Cons: Weaker in reds than Xvid. Slow encoding process.
For this section I'm assuming you're using my x264 pack and that you followed the readme.txt in it correctly. I'm also assuming that you exported an uncompressed video and audio file from vegas (section 7B) or premiere (section 7D).
This section is for advanced users. Some of the encoding will take place in the command line prompt. It's not that hard, but if you're not that great with computers you might want to overlook this and just encode in wmv.
Okay, you should have this folder filled with all your x264 files:
C:\Documents and Settings\username\x264
Put both your uncompressed .avi and uncompressed .wav in this folder. Make both of their names the same. You can decipher them by their file extentions.
Audio Encoding:
Start > Run > cmd
This is the command prompt. When I tell you to type something in it DON'T USE THE QUOTES.
The default directory should be:
C:\Documents and Settings\username
type "cd x264" and hit enter
Now your directory should be:
C:\Documents and Settings\username\x264
type "faac -w -b 128 audiofilename.wav" and hit enter.
Your audio file should encode pretty quickly.
You will now have a file called "audiofilename.m4a" in your C:\Documents and Settings\username\x264 folder. This is your compressed audio.
Video Encoding:
Remember, resolution (width and height) must be divisible by 16!
Right-Click in any white area in your C:\Documents and Settings\username\x264 folder > New > Text Document.
Rename it to: videofilename.avs
Windows will ask you if you want to change the file type. Say yes.
Open up the file (it won't know what program to use. Just do Chose Program from List and use notepad). Put this in the body:
AVISource("videofilename.avi")
Crop(0,0,-0,-0)
ConvertToYV12()
Save it and close it.
Open up megui.exe.
Input Tab under Video Encoding:
Codec > x264
File Type > MP4
Across from AviSynth Script click on the "..." Button. Browse to: C:\Documents and Settings\username\x264 and click on videofilename.avs.
A new window should open up with the video file. You don't need to do anything there. Just close it.
Back in your main window, hit Config.
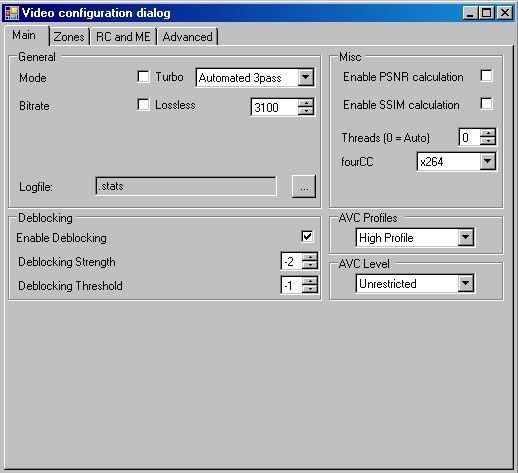
The first thing you MUST do is set your "AVC Profiles" to "High Profile"
Then, use these settings for your main tab:
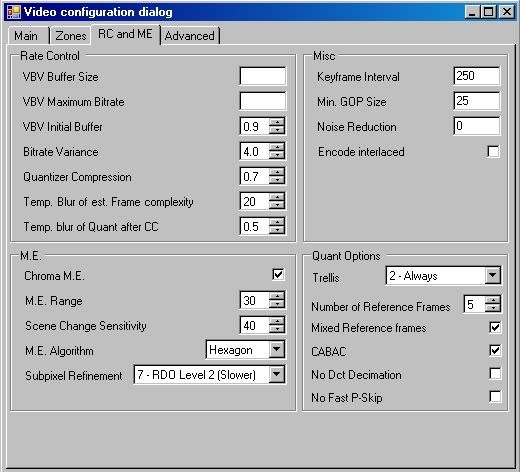
For your RC and ME tab, use these settings:
For you advanced tab, use these settings:
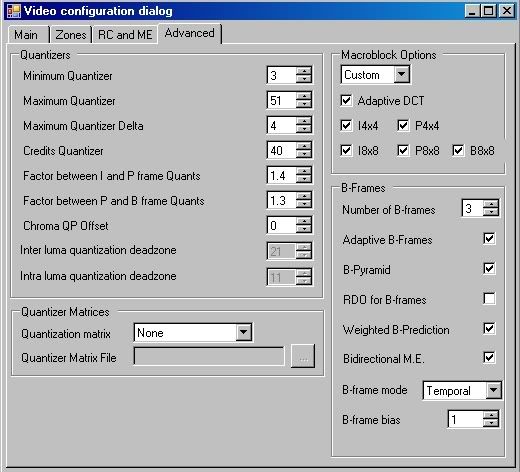
Note: I can't guarentee good quality or smooth playback with these settings. x264 is tricky. Every video is different. Currently I get about 23 MB/minute with amazing quality @ 800x600 with these settings. You might need to raise/lower the bitrate depending on resolution.
Hit okay. Then back in your main window, hit Enqueue below the config button. Go to the queue tab and hit start.
Encoding in x264 takes a VERY long time. Be patient. After you're done encoding, you'll have a file named "videofilename.mp4" in your C:\Documents and Settings\username\x264 folder. This is your compressed video file.
Muxing (combining your video and audio):
Open up YAMB.
Across from Audio and Video in blue text hit add. Add both your audiofilename.m4a and your videofilename.mp4 files. For the final time, THEY MUST HAVE THE SAME NAME OR YOU WILL GET ERRORS.
Down in the bottom right hit mux. Save it as what you want and hit okay.
AND YOU'RE DONE.
I'd like some feedback on the quality and mb/minute you guys are getting with those settings.
8C. LAME, VirtualDubMod, and more for Xvid:
Xvid MPEG-Layer 4 Codec:
Pros: Low file size, high quality at any resolution, accurate colors all around.
Cons: None.
For this section I'm assuming you're using my Xvid pack and that you followed the readme.txt in it correctly. I'm also assuming that you exported an uncompressed video and audio file from vegas (section 7B) or premiere (section 7D).
This section is for advanced users. Some of the encoding will take place in the command line prompt. It's not that hard, but if you're not that great with computers you might want to overlook this and just encode in wmv.
Okay, you should have this folder filled with all your Xvid files:
C:\Documents and Settings\username\xvid
Put both your uncompressed .avi and uncompressed .wav in this folder. Make both of their names the same. You can decipher them by their file extentions.
Audio Encoding:
Start > Run > cmd
This is the command prompt. When I tell you to type something in it DON'T USE THE QUOTES.
The default directory should be:
C:\Documents and Settings\username
type "cd xvid" and hit enter
Now your directory should be:
C:\Documents and Settings\username\xvid
type "lame audiofilename.wav audiofilename.mp3" and hit enter.
Your audio file should encode pretty quickly.
You will now have a file called "audiofilename.mp3" in your C:\Documents and Settings\username\xvid folder. This is your compressed audio.
Video Encoding:
Remember, resolution (width and height) must be divisible by 2!
Right-Click in any white area in your C:\Documents and Settings\username\xvid folder > New > Text Document.
Rename it to: videofilename.avs
Windows will ask you if you want to change the file type. Say yes.
Open up the file (it won't know what program to use. Just do Chose Program from List and use notepad). Put this in the body:
AVISource("videofilename.avi")
Crop(0,0,-0,-0)
ConvertToYV12()
Save it and close it.
Open up VirtualDubMod.exe:
-File > Open Video File > Browse to your videofilename.avs file.
-Streams > Steam List > Add > Browse to your audiofilename.mp3 file.
-Video > Compression > Select Xvid MPEG-4 Codec. Hit Configure.
In your XviD Configuration Window:
-Profile @ Level: (unrestricted). Hit the more... button to the right of it.
In the new window, use these settings:
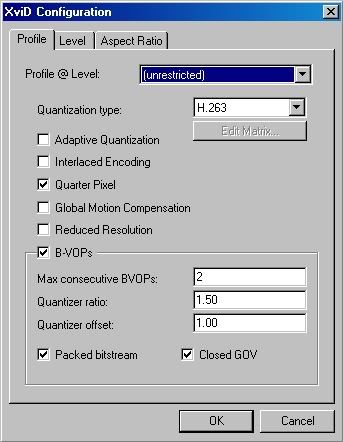
Hit okay. Back in your main XviD Configuration Window:
-Encoding Type: Twopass - 1st pass
Hit "Advanced Options..."
In new window's Motion tab, use these settings:
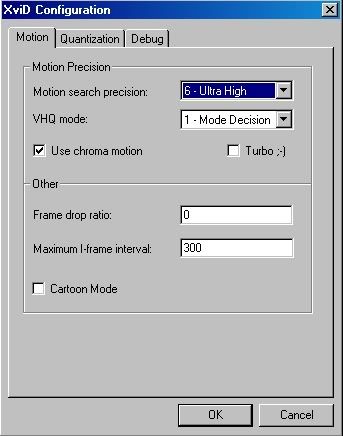
In the Quantization tab, use these settings:
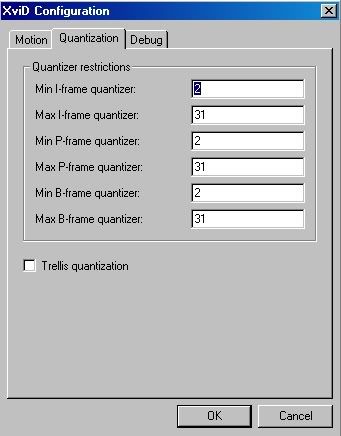
Hit Okay. Okay. Okay.
Back in your VirtualDubMod Main Window:
-File > Save As (F7) > CHECK "Don't run this job now; add it to Job Control so I can run it in batch mode." Save it as "firstpass.avi" in your C:\Documents and Settings\username\xvid folder.
Back in your VirtualDubMod Main Window:
-Video > Compression > Select Xvid MPEG-4 Codec. Hit Configure.
In your XviD Configuration Window:
-Encoding Type: Twopass - 2nd pass
-Target Bitrate: 4500-5000 (I use 4900, depends on video resolution. You can find an optimal bitrate using the XviD bitrate calculator. The higher the resolution, the higher bitrate you'll need)
If it says "Target Size (kbytes)" instead of "Target Bitrate (kbps)," just click on the "Target Size (kbytes)" text and it will switch to "Target Bitrate (kbps)."
Hit okay. Okay.
Back in your VirtualDubMod Main Window:
-File > Save As (F7) > CHECK "Don't run this job now; add it to Job Control so I can run it in batch mode." Save it as "secondpass.avi" in your C:\Documents and Settings\username\xvid folder.
-File > Job Control (F4) > Start
There will be a firstpass.avi and a secondpass.avi in your C:\Documents and Settings\username\xvid folder. The secondpass.avi is your finalized project.
AND YOU'RE DONE.

